If you are like me and you like to live on the bleeding edge, you will probably have encountered the lack of tutorials, introductions or HowTos for new web APIs. If a new “thing” has actually made it into a browser, like Firefox Nightly or Chrome Canary, the only thing you might have at your disposal is probably the API spec and those tend to be hard to navigate and – fair warning – can turn out to be pretty unreliable.
WebVR
Today I started to familiarize myself with WebVR. At the time of writing, Firefox Nightly and Samsung Internet Browser has support for WebVR and there are custom Chromium builds for Windows. Yes, that’s Chromium, not Chrome Canary. There’s a branch on the Chromium repo, but the code has not been pulled into master, so my colleague Brandon Jones picked up the slack and is providing custom builds. Once the code has been pulled in, I expect WebVR to be available in Canary behind a flag rather quickly.
I don’t own an VR device besides a Google Cardboard, but as it turns out that is not necessary to explore the API. Despite only two and a half native implementations and the rather expensive required hardware, WebVR already has a surprisingly vibrant community which have found ways to get started with WebVR regardless. There’s ThreeJS demos, there’s an Chrome extension that emulates a VR device in DevTools, and there’s a polyfill with a very nice progressive enhancement approach to the whole problem.
So much for the ecosystem. However, how do I write WebVR? Most of the WebVR articles I found were snippets of code that did most of the work for you and didn’t explain how or why, mostly using ThreeJS. At that point I didn’t even know where the line for responsibilities is drawn between WebGL and WebVR. My work with Houdini taught me to work with specs a little and so I was less afraid to dive into the WebVR spec. Hopefully you’ll feel the same in the future after reading this.
Specs and where they come from
I know it doesn’t sound that way when you (try to) read them, but specs are written by humans. Like, real people. The reason I am mentioning this is because even though they sound like they follow a strict pattern and have very well defined and concise language (“MUST”, “SHOULD”, …), they are more prose with pseudo-code than anything else. I will try my best to give general instructions on how to navigate and “parse” a spec, but keep in mind that each will have its own flavor and you will need your brain to understand them.
At the time of writing, WebVR was an Editor’s draft. Even though that is pretty early in a spec’s life cycle, it does mean that the proposal has a good amount of momentum and that a working group is working on it. Due to the public attention WebVR has gotten, I am assuming it is well reviewed and follows the best practices pretty closely. But in general: The earlier the spec is in the process, the more a spec might deviate from said best practices. Once a spec has reached the W3C, reviews will have ensured that language (insert “normative” joke here), structure and code are sufficiently in line.
The sections of a spec
Note: For the sake of consistency, I saved a copy of the spec as it was at the time of writing. All future links will use this copy instead of the official spec.
Where do we start? In the spec! Well, not quite, but as a stepping stone to the “Explainer”. An explainer is written before the spec itself is used as a foundation to have a discussion about the API proposal. It gives a high-level rationale and a rough outline of the API that the author(s) envisioned. The good thing about explainers are that they are not 20 million pages long and use normal English. They might even be enjoyable to read.
Specs on the other hand are probably not something you’d read top-to-bottom if you are trying to get started. You are greeted with formalities, the “Status of this document” and other things that don’t really help you understand how to use this API. It’s easy to get lost. So where do we find the explainer? Hopefully in the header of a spec or in the links contained therein.
Heading & Explainers
The heading tells you what the name of the spec is (duh), what stage of the lifecycle it is in and when this version of the spec has last been updated. It also tells you who your main points of contact are, where this spec is maintained (mostly GitHub nowadays) and how to file issues.
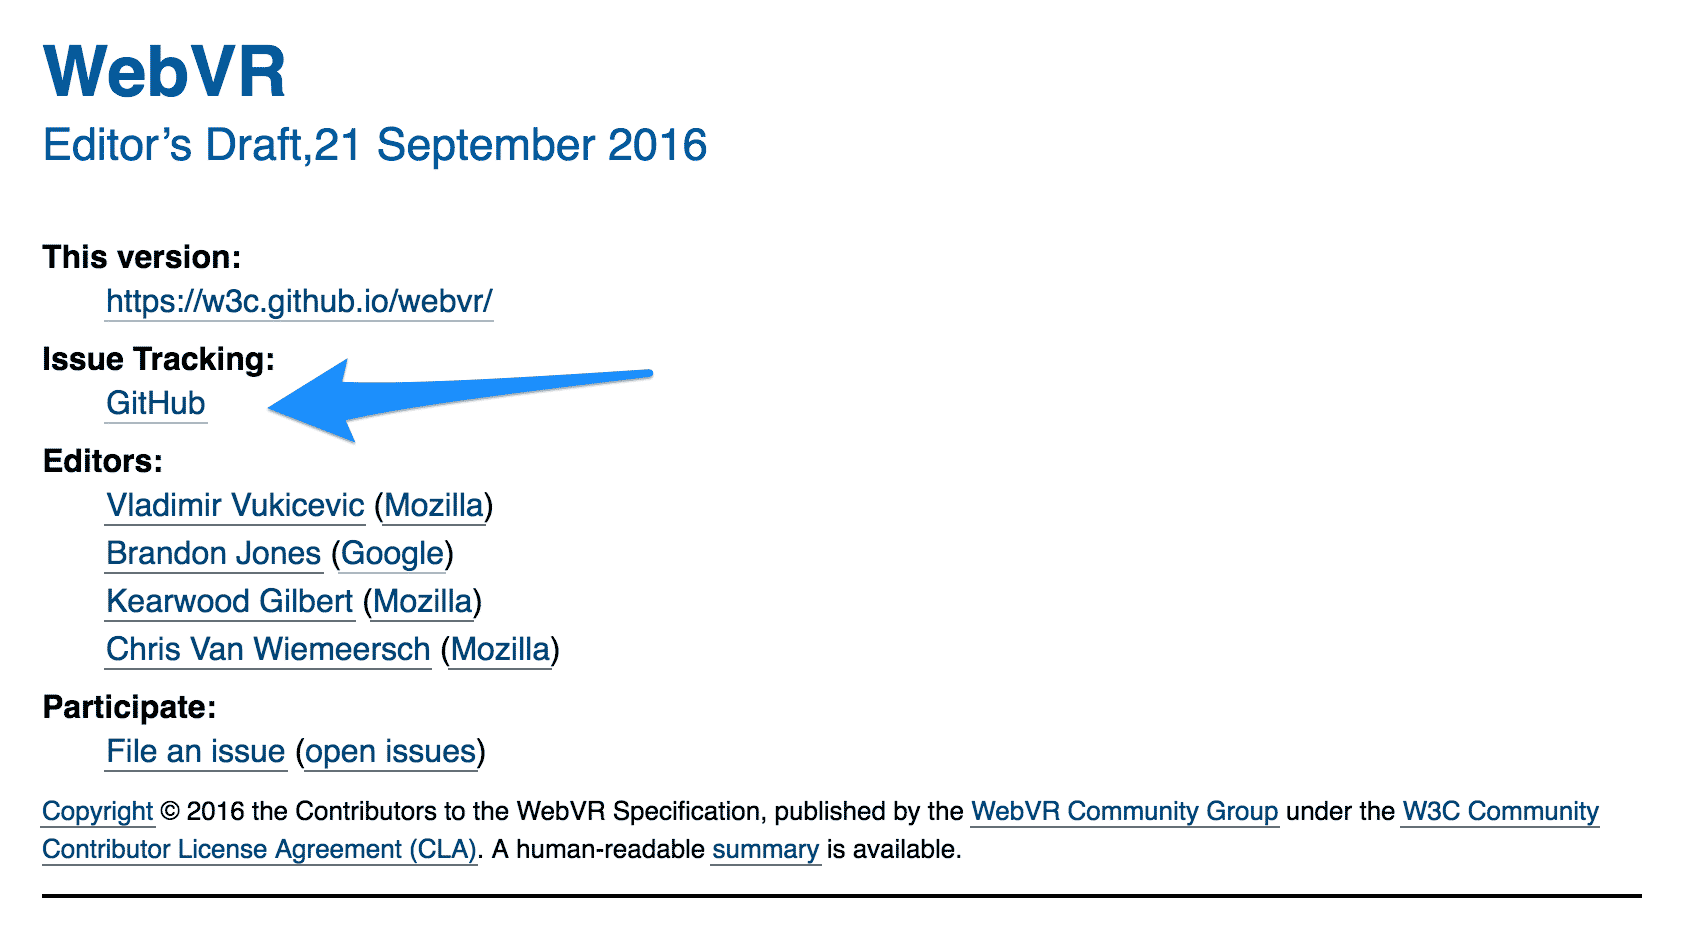
Although it is not explicitly linked, the repository where the spec is maintained usually also contains an explainer. Taking a look at the linked GitHub repository, you’ll find a explainer.md. Take a look!
Introduction
Even though we just read the explainer, I’d advise you to read the “Introduction” section as well. The explainer might get outdated the further along an API has become. The introduction covers what the API in its current state tries to accomplish and why. The rest of the spec will be about how.
What follows after the introduction is not always the same and is highly dependent on the type of spec you are looking at. As a few examples for comparison, take a look at any or all of the following:
Interfaces (and how to use them)
At some point – at least for JavaScript APIs – you will come across code fragments that define interfaces. JavaScript doesn’t really have the concept of an interface (let alone types), so a JavaScript-like syntax called “WebIDL” is used instead. The official spec for WebIDL is not a light read, but luckily it is rather intuitive.
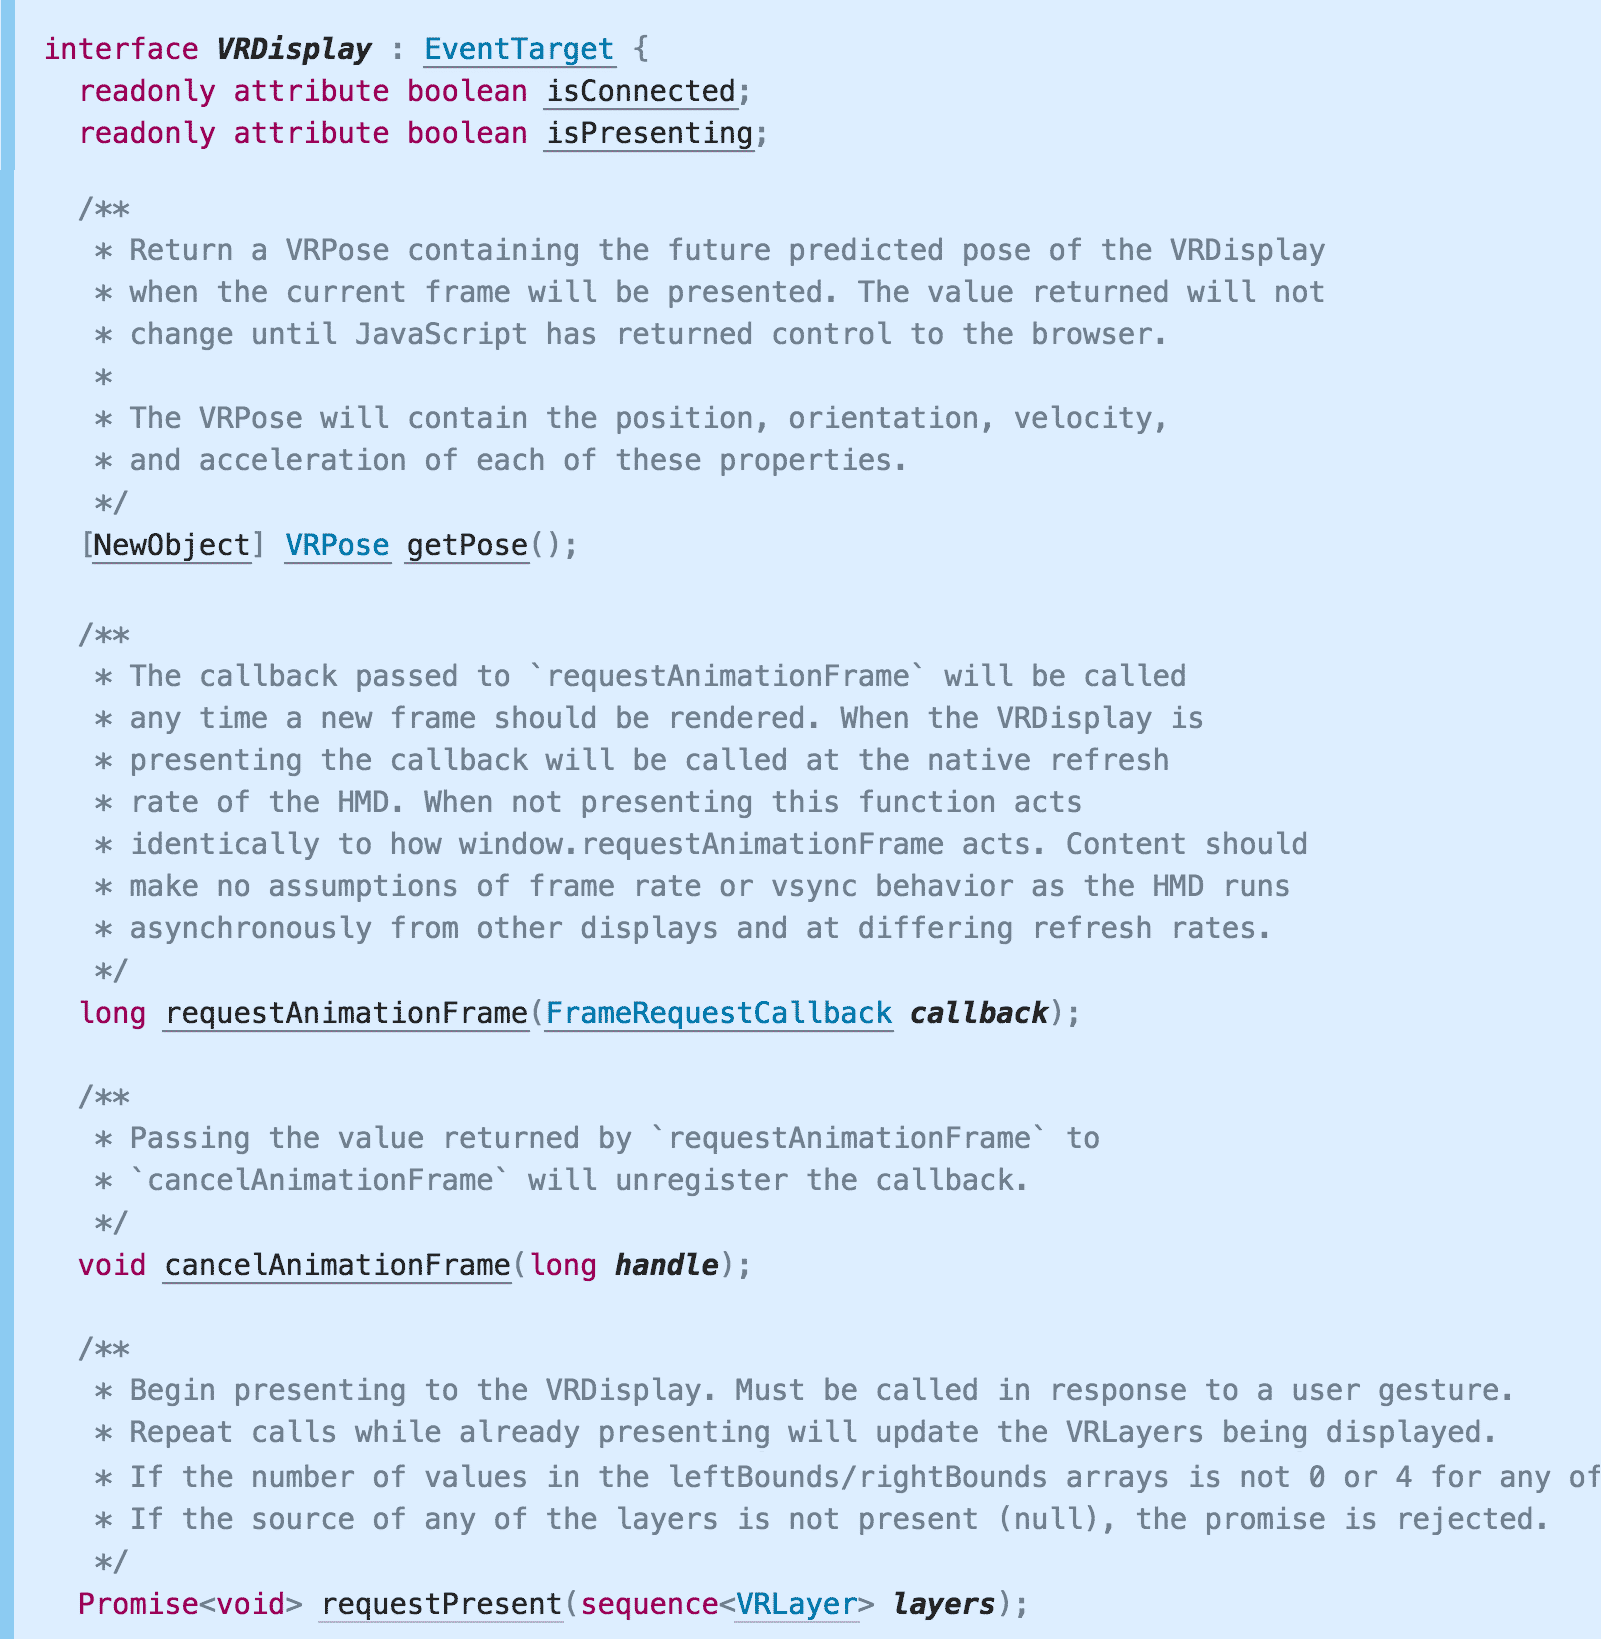
Looking at the methods defined on the VRDisplay type, it was clear that I wanted to get an instance of that type to do WebVR. Methods like getPose() or requestAnimationFrame() seemed like what I needed. So I opened up Canary (with the VR emulation extensions mentioned above) and tried to instantiate that type to get started.
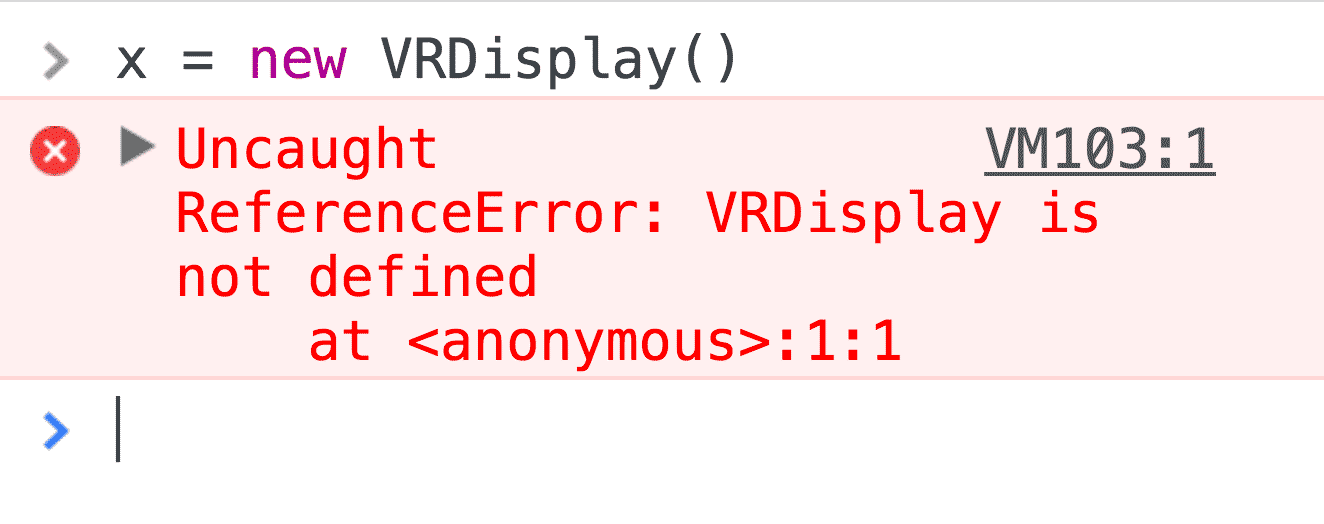
I call this “Exploration by DevTools AutoComplete”. It makes sense that this is not an exposed type (i.e. a type whose constructor is attached to the window object) as it must be backed by real hardware and therefore must be instantiated by the browser. Sadly, the section that defines and explains VRDisplay doesn’t offer any code on how to acquire a reference to such a display, but only an example on how to use a VRDisplay if you already have a reference.
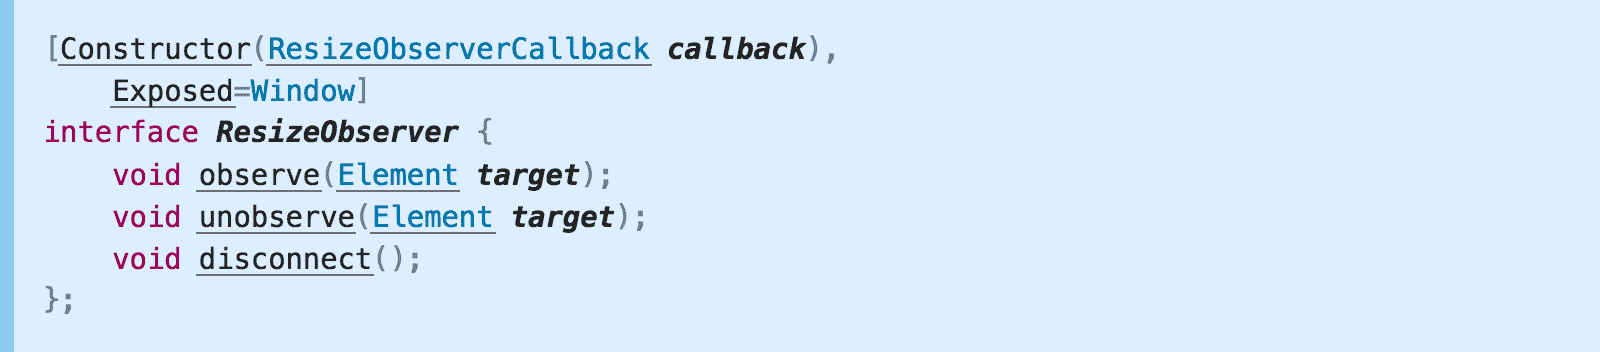
Having read other specs like ResizeObserver, I knew that types can expose their constructor to the developer’s runtime. A line above the interface definition can define the signature of the constructor and to which global object it is attached to.
No such line is in WebVR’s definition of VRDisplay, though.
Interface extensions and partial interfaces
Another way to expose types and/or their constructors to the developer’s runtime is by extending existing interfaces. For example, ServiceWorker defines a partial navigator interface to expose a ServiceWorkerContainer to the developer.
Looking at the ToC of the WebVR spec, there’s a section called “Navigator Interface extension” and “Window Interface extension”. The latter only defines a few new events, while the former is exactly what we were looking for!

The first method, getVRDisplays(), returns a promise that resolves to a sequence of VRDisplay. Exactly what we want! It’s time for another round of “Exploration by DevTools AutoComplete”.
Note: Sequences are anything that is iterable in the sense of JavaScript. Most likely, it’s an array, but other types like NodeList are technically possible.
We got our VRDevice! Now we can use all the methods defined on that type or read the example we found earlier. According to the example, we should call requestPresent() and pass in... an array of objects with only one attribute?

Typedefs
Looking at the WebIDL for requestPresent, it expects a sequence of VRLayer. So let’s look at the definition of VRLayer (ProTip™: Just click it!).
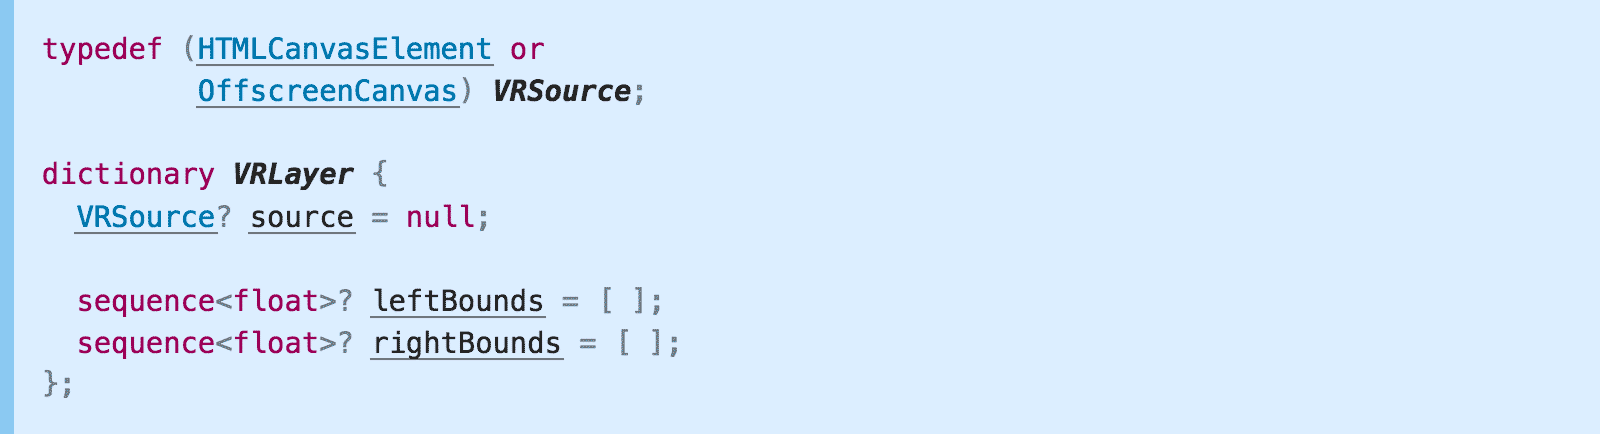
So a VRLayer is a dictionary with three optional attributes. Directly underneath we find an explanation:
source The
sourceattribute defines the canvas whose contents will be presented by theVRDisplaywhenVRDisplay.submitFrame()is called.
leftBounds The
leftBoundsattribute contains four values defining the texture bounds within thesourcecanvas to present to the eye in UV space:[0]left offset of the bounds (0.0 - 1.0);[1]top offset of the bounds (0.0 - 1.0);[2]width of the bounds (0.0 - 1.0);[3]height of the bounds (0.0 - 1.0). TheleftBoundsMUST default to[0.0, 0.0, 0.5, 1.0].
rightBounds The
rightBoundsattribute contains four values defining the texture bounds rectangle within thesourcecanvas to present to the eye in UV space:[0]left offset of the bounds (0.0 - 1.0);[1]top offset of the bounds (0.0 - 1.0);[2]width of the bounds (0.0 - 1.0);[3]height of the bounds (0.0 - 1.0). TherightBoundsMUST default to[0.5, 0.0, 0.5, 1.0].
Okay! So, each VRLayer has a VRSource, for which we define 2 rectangles to map regions to left and right eye, defaulting to a split right down the middle of the source.
The definition for a VRSource is right above the definition of a VRLayer and is a typedef. Typedefs, as they are known from C, are nothing more than a type alias, although in this case it’s more like a union. A VRSource can be either HTMLCanvasElement or a OffscreenCanvas. So both just work as a value for the source attribute.
And with this, the call to requestPresent() in the example makes sense. It expects a sequence (hence the array) of VRLayers (hence the objects with a source attributes).
… and now it’s WebVR
The next steps are left as an exercise for the reader. Just kidding. Well, kind of. At this point, you should have all the tools and knowledge to navigate this spec yourself. If not, let me know where you got stuck so I can augment this blog post appropriately! Have other specs you are trying to read and don’t understand? Hit me up on Twitter.
Shoutouts
Thanks to Jake “I’m not Paul” Archibald and Chris Wilson for proof-reading and improving this post!